

How To Use Pro Tools On Windows 10

In this guide, nosotros volition show yous how to get started with the Pro Tools DAW software. That means we'll testify you how to create a session, set up sound and MIDI devices, and then record with them. Follow the sections below to go started.
- Launch and scanning plug-ins
- Scanning plug-ins
- Create a new Pro Tools session
- Navigate Edit and Mix windows
- Audio: Setup and record
- Select audio hardware
- Configure DAW I/O settings
- Create and tape audio tracks
- MIDI: Setup and record
- Connect MIDI controller
- Enable MIDI device
- Create and record MIDI tracks
Launch and scanning plug-ins
Once you've gotten Pro Tools both activated and installed, the side by side matter to do is launch the DAW software. The first time y'all use Pro Tools, it will scan your organisation for plug-ins and devices but, in one case done, will prompt you to either open or create a new session.
If Pro Tools can't detect its license, you'll be prompted to either connect an iLok USB dongle or showtime an iLok Cloud Session. Check our iLok Licenses and Activation Codes guide for more information. In one case y'all can create a session and navigate the windows go on to tape sound.
When you launch Pro Tools, it first does scan for plug-ins (instruments and effects). That just means information technology'southward adding all the AAX plug-ins installed on your reckoner into the DAW. If your plug-in is not available as AAX, information technology will not exist loaded into the Pro Tools, and you lot'll need to either find an updated AAX version or utilise a unlike plug-in. Learn more virtually Pro Tools plug-in compatibility.
- If aplug-in can't detect its license, you lot'll be prompted to either resolve the issue or movement the plug-in to anUnused folder.
- To view plug-ins by both categoryand manufacturer, select thePro Tools menu and choosePreferences… In the Display tab, for the starting time drop-downwards menu, selectCategory and Manufacturer and clickOK.
If yourAAX compatible plug-ins aren't showing up, they might need to be rescanned or reinstalled. Attempt each of the solutions below to get your plug-ins back.
- Restart your calculator and restart Pro Tools
- Trash your Pro Tools preferences
- Download and reinstall the plug-in
Launching Pro Tools and scanning in plug-ins.
Pro Tools works in sessions. That means when you're recording a song or working on a project, yous'll open its.ptx Pro Tools session file. When creating a new session, you'll need to consider a few settings(east.g., sample rate, bit depth, file type).44.1kHz, 24bit, and.WAV will work for many purposes and are commonly used. Learn more near how to create your outset Pro Tools session.
- File Type (.WAV or .AIFF): Select the default audio file format for recorded tracks. Pro Tools can utilise both simultaneously, so don't worry nigh starting in one format then importing from the other. Learn more about .WAV and .AIFF.
- Flake Depth (16-bit, 24-bit, or 32-chip float): This is the dynamic resolution of recorded audio. We recommend 24-fleck for nigh music production users. While all three will sound great, just remember that the larger the bit depths will always produce a larger file size. Learn more than about bit depth.
- Sample Rate (44.i – 192 kHz): The amount of times per 2d audio is digitally sampled/recorded. We recommend 44.1 kHz(for CD) or 44.8 kHz(for DVD) to almost new music production users. Learn more about sample rates.
- I/O Settings (Last Used or Presets): These are the settings Pro Tools uses for labeling and routing signal in and out of your audio interface.
Pro Tools Tech Tips — Playback Engine
Navigate Edit and Mix windows
When you lot use Pro Tools, you lot'll mainly work in theEdit andMix windows. TheEdit window is where you edit audio, create fades, and draw parameter automation. MIDI is similar, simply in its ownMIDI Editor window instead. TheMix window is where y'all control each track'due south level, inserts, and sends. In other words, that'due south where you create the mix by adjusting book and inserting plug-ins. View theWindow menu for more options and configuration settings.
Useful commands
The hotkeys beneath are some useful shortcuts we found useful for navigating and editing in Pro Tools. Learn more most useful Pro Tools shortcuts.
| Action | Mac | PC |
|---|---|---|
| Horizontal Zoom | Control + [ or ] | Ctrl + [ or ] |
| Amplitude Zoom | Command + Choice + [ or ] | Ctrl + Option + [ or ] |
| Split up region | Command + East | Ctrl + E |
| Heal separation | Command + H | Ctrl + H |
| Create Fade | Command + F | Ctrl + F |
| Save Session | Control + Due south | Ctrl + South |
Pro Tools Tech Tips — Keyboard Shortcuts
Pro Tools Tech Tips — Runway I/O Keyboard Shortcuts
Audio: Setup and tape
1 of the commencement things to do once you lot create a new session is to get-go recording audio. To do that, you volition start need to configure the audio settings. That means yous will need to select your audio hardware, configure the DAW input and output settings, and and so create and record some audio tracks.
Pro Tools, like nigh DAW's, has its own sound settings. That means you'll need to select your audio device inside thePlayback Engine settings. If this is the first fourth dimension connecting your sound interface, you lot'll want get-go to install its driver software. In one case washed, the interface can be connected direct to the computer and so selected equally the Playback Engine.
Yous'll also need to select theH/W Buffer Size, which determines the amount of time your calculator has to process sound earlier outputting to the speakers. When recording and input monitoring, you'll use alower value for less latency(less processing fourth dimension). For mixing and producing or when you're not recording, select ahigher value for more than buffer processing time(more latency, but more than time for signal processing).
- Go to theSetup carte and selectPlayback Engine.
- Select your audio interface from thePlayback Engine drop-down menu.
- Select theH/W Buffer Size:
- Lower for input monitoring while recording (less latency and processing)
- Higher for mixing and producing (more than latency and processing)
- Ignore Errors During Playback/Record:OFF
- Dynamic Plug-in Processing:ON
- Video Engine:OFF
Sound interface not showing upward?
If your audio device does not show up, follow our troubleshooting guides for PC(Windows) or Mac(macOS).
Once the audio interface is selected as the Playback Engine, its connections need to be configured within the Pro ToolsInput and Output (I/O) Settings. That just ways yous'll tell Pro Tools what to title each of your interface's input and output channels. These settings don't require customization only should be set todefault when getting started for the first time. Within the I/O Settings are multiple routing tabs, merely you only demand to configure theInput,Output, andMotorcoach tabs.
Click theSetup menu and selectI/O…. For each of theInput,Output, andBus tabs:
- Select all the paths and clickDelete Path.
- Click Default.
- Rename or reroute any paths.
- ClickConsign Settings… and salve the settings(e.g., Apollo Twin Input, AVB Outputs, or Mastering).
If your organization doesn't involve much(just stereo out and virtual Pro Tools busses) then I/O settings aren't a big bargain. Systems with more channel counts or outboard gear accept a lot more than inputs and outputs, which means recreating the I/O settings for large setups tin accept a while. Since I/O settings are unique to the system, we recommend saving them to not simply the default folder, just thesession folder, too. If the I/O settings need reset; save your settings, salve the session, and and then default the I/O to the current Playback Engine.
- Inputs are the same inputs of your interface(e.thou., mic preamps, line, ADAT or S/PDIF inputs) and are what you select on Pro Tools tracks to determine what audio gets recorded to them.
- Outputs only ship indicate to the speakers or outboard gear(e.g., monitor, ADAT or S/PDIF outputs). Most tracks will have their output assigned to the master speakers, but all other outputs can be customized to your liking.
- The Bus tab represents the internal mono or stereo busses(paths) that Pro Tools uses for sending audio to other tracks. You'll also run into that some of the busses also accept selections in theMapping to Outputs column. This is so you lot can send audio directly to 1 of your Playback Engine's outputs.(east.chiliad., to outboard gear or a headphone distribution arrangement).
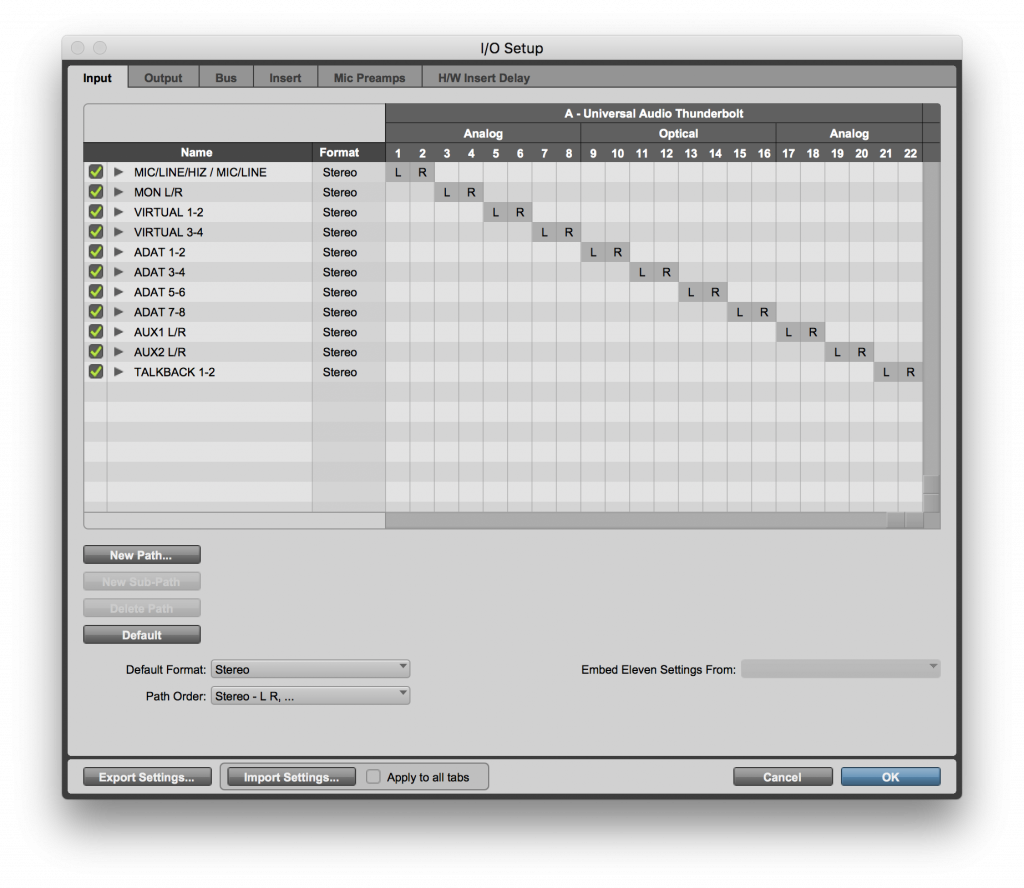
Input tab
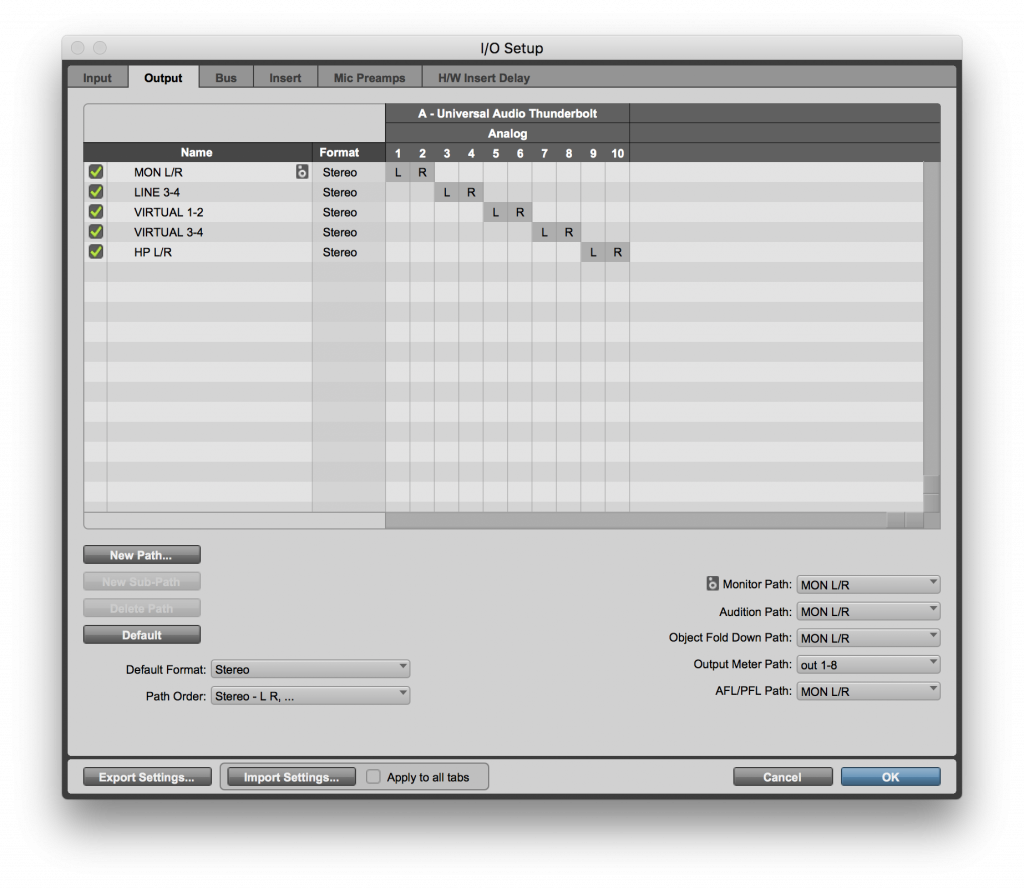
Output tab
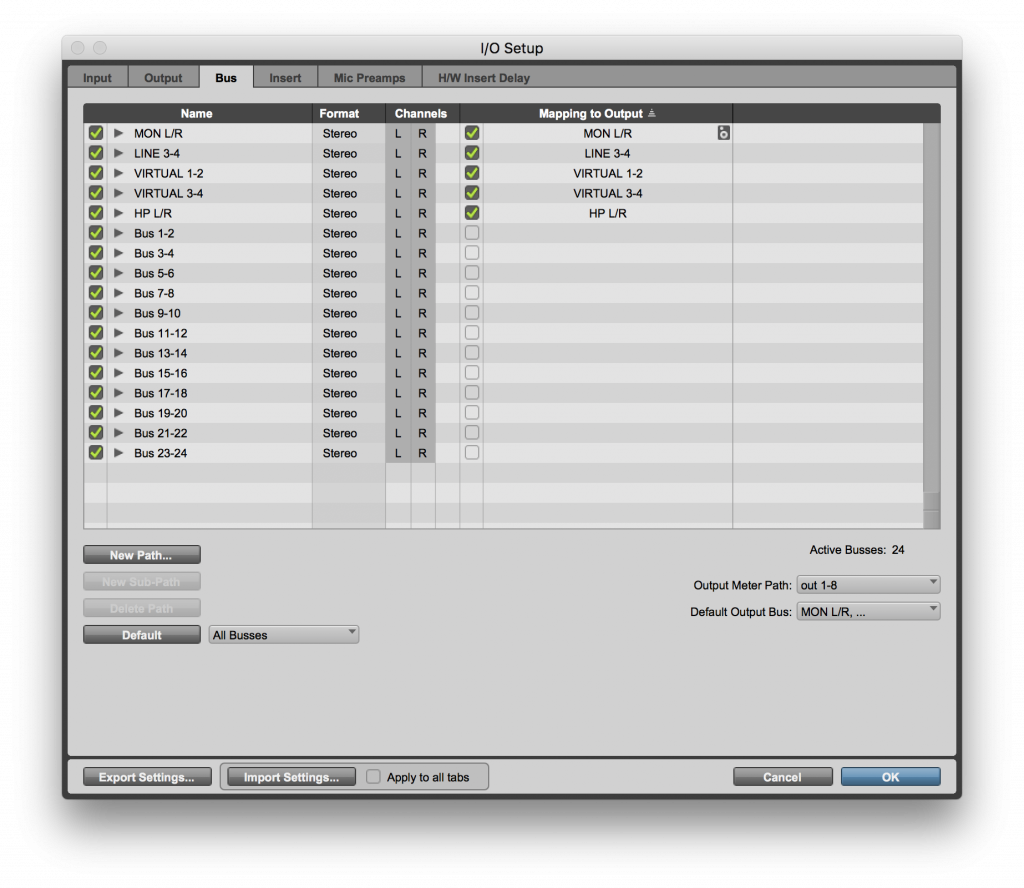
Passenger vehicle tab
Create and tape audio tracks
Recording audio is a cakewalk once the audio settings are configured. All you take to do is create a mono or stereo track, select the input, and and so start recording. Each time you create a new track, consider renaming it and changing the rail color. To practice and so, just double-click its name or channel tab. Keeping organized with good track titles and clear colors volition add a lot to your Pro Tools workflow.
One time sound is recorded, it volition be saved in your session folder'sAudio Files folder. Make sure when copying or moving a Pro Tools session folder that the .ptx file and Audio Files folder are always kept together. This will ensure that you'll always exist able to restore your session.
- Open theTrack menu and chooseNew….
- Select aMono(1 channel) orStereo(2 channels) Audio Runway and clickCreate.
- Select the track'sInput andOutput paths. You lot can besides double-click the track's name to rename information technology.
- Click thetrack'southRecord Enable push button and set up the preamp proceeds level on your recording device.
- Select where y'all want to record, click theTransport'sRecord Enable button, and then clickPlay. Clicking eitherPlay orStop will end recording and playback.
To utilise plug-ins and furnishings in Pro Tools, they must be selected as inserts. Aqueductinserts are the substantially effects inserted to a channel. You can too selecthardware inserts for outboard gear, only that requires additional I/O configuration. The point flows from top to bottom, so the order you choose volition have a direct bear on on the processed point.
Pro Tools Tech Tips — Actuate Sends and Inserts
Pro Tools Tech Tips — Bypassing Inserts
MIDI: Setup and record
To play virtual instruments, you'll demand to ship them MIDI information. You can write MIDI in Pro Tools, but you'll probable prefer using a keyboard or drum controller. Many MIDI controllers are autobus-powered, significant they're powered from a USB connection and do not crave a ability supply adapter. If your MIDI controller includes driver software, make sure to install it before connecting your device.

MIDI controllers volition connect to your computer either via USB or MIDI. While virtually will work just fine over MIDI, some controllers crave(or only have) USB connections to admission all their features. One time connected, cheque that your MIDI controller is detected in Pro Tools.
USB is a common connection present, and oft used because it also provides power to the controller. That means the device is both connected and powered from the aforementioned USB port. Many MIDI devices have an additional power jack for connecting an external power supply, which is useful when using a MIDI connexion instead of USB. A USB hub tin help connect multiple devices to your estimator, merely we only recommendpowered hubs with a dedicated power supply adapter.
- USB-A to USB-B cable
- Requires available USB port
- Double-decker powered from USB connectedness
- MIDI in and out(if supported)
- Supports optional software features
Some other choice is to connect viaMIDI to a MIDI or audio interface's MIDI input jack. This manner, the MIDI controller will announced as the interface's MIDI port instead of its USB device title. Continue in mind that since MIDI does not provide bus power, you will need either USB power or a wall wart ability adapter to turn on the device.
- 5-pin MIDI cable
- Requires available MIDI port
- USB connection to calculator not required
- Requires additional power supply adapter
- Separate cables required for MIDI In/Out
When you launch Pro Tools, it will browse for your continued MIDI devices. All you lot have to do is make sure the devices are enabled(checked) in theMIDI Input Devices menu. For MIDI controllers with more than just keys or pads, you'll also need to configure them inside thePeripherals bill of fare. This volition enable the encoder knobs, faders, and transport features on most controllers. While like, not all MIDI controllers are alike, so visit the device'southward user manual for specific installation and configuration instructions.
- Click theSetup menu, get toMIDI, and selectMIDI Input Devices.
- Select each MIDI device port you lot wish to enable. Unchecked ports will be disabled in Pro Tools.
- Click theSetup carte and cullPeripherals…
- Select theMIDI Controllers tab and configure your device(s):
- Blazon: HUI, M-Audio Keyboard
- Receive/Send: input and output ports
- #Ch'southward: bank of MIDI channels
Pro Tools Tech Tips — Virtual MIDI Keyboard
Create and record MIDI tracks
To "play" virtual instrument plug-ins, yous demand MIDI data. MIDI data can be drawn in with your mouse(in the MIDI Editor window) but too recorded by playing your device. There are two methods for recording MIDI and playing virtual instruments. The first option is quick and straightforward, only the second is more than useful when sending multiple MIDI tracks to the aforementioned virtual instrument. Keep in mind that MIDI data plays the instrument, and the MIDI data alone is non sound. You'll need to tape it to an audio track if you desire an bodily sound file.
Instrument Runway – a combination of MIDI and Aux Input tracks. Records MIDI simply, holds virtual instrument plug-in and outputs sound for monitoring. Audio tin can exist sent to an audio track(via a bus transport) for recording.
- Select theTrack menu and clickNew.
- SelectStereo from the first drop-down menu,Musical instrument from the second drop-down menu, and then clickCreate.
- Go to theMix window, click on the insert selector at the top of the musical instrument rails and select the instrument plug-in you lot'd similar to use
- Tape enable the musical instrument track and play your MIDI controller.
Pro Tools Tech Tips — Musical instrument Folder Presets
MIDI runway: records MIDI information(not audio). Assign ane or more MIDI tracks' output(due south) to a virtual instruments MIDI input(s).
Aux Input track: holds the virtual instrument plug-in and outputs audio. Can be sent to an audio track(via a jitney send) for recording.
- Select theRails menu and clickNew.
- Create both aMIDI rails andStereo Aux Input rail.
- Become to theMix window and insert a virtual instrument plug-in on theAux Input runway.
- Select theMIDI track's output and choose the inserted virtual musical instrument.
- Tape enable the MIDI track and play your MIDI controller.
Pro Tools Tech Tips — Retrospective MIDI Tape
There is a lot you can exercise with MIDI in Pro Tools. In particular, you might want to know the additional recording modes, or how to record virtual instruments to audio tracks.
Pro Tools has a few other ways for helping your tape MIDI performances. Consider the post-obit:
- Loop Record: This volition permit you tape a section over and over.
- Destructive: Similar to loop mode, information technology will allow yous track over and over, but it will erase your previous take.
- Punch In/Out: This will let you to add together punch-in and punch-out points where it will only record during that specific department.
- Quantize: By quantizing, you lot can alter the position of MIDI data to the nearest selected grid position in the measure out.
- Select theRails menu and clickNew.
- Create aStereo Audio track.
- Select aStereo Motorcoach(e.g., Double-decker 1-2) for theaudio track's input.
- Assign the aforementionedStereo Bus to the virtual instrument track'due southSends orOutput.
- (optional) When using a bus ship, you besides need to turn up thetransport level. Consider enabling thePRE fader button to bypass the track's level(level fader and mute).
- Record enable both the audio runway and transport then pressPlay.
Pro Tools Tech Tips — Get Started Playlist
Pro Tools Tech Tips — Dig Deeper
When you need help, Sweetwater has the answers!
Our noesis base contains over 28,000 expertly written tech articles that volition requite you answers and help you get the most out of your gear. Our pro musicians and gear experts update content daily to keep you lot informed and on your way. Best of all, it's totally FREE, and information technology'due south but another reason that you become more at Sweetwater.com.

Source: https://www.sweetwater.com/sweetcare/articles/pro-tools-quickstart-guide/
Posted by: rodriguezuntentoody.blogspot.com
0 Response to "How To Use Pro Tools On Windows 10"
Post a Comment